

The charm and nostalgia of classic Datsun vehicles are undeniable. However, their age often brings one common enemy: rust. Rust repair is crucial for maintaining the aesthetic integrity and structural safety of these beloved cars. Understanding how to effectively handle rust damage ensures that your Datsun remains functional and visually appealing for years to come.
Identifying rust early is essential in any repair process. Classic Datsun models are particularly susceptible to rust due to their age and the materials used in their construction. Areas such as wheel wells, undercarriages, and the body panels need close inspection. By detecting rust at an early stage, you can prevent extensive damage, which often requires more complex and expensive repairs later on.
In this article, we will explore several effective rust repair techniques tailored specifically for classic Datsun vehicles. From basic surface treatments to more in-depth restorative methods, our focus will be on practical steps that both novice and experienced car enthusiasts can implement. By equipping yourself with the right knowledge and skills, you can ensure that your Datsun remains a timeless classic, free from the corrosive grasp of rust.
Assessing Rust Damage: Identifying Problem Areas in Datsun Bodywork
When dealing with classic Datsun vehicles, identifying rust damage is crucial for proper restoration and maintenance. Rust can manifest in various areas of the bodywork, compromising the structural integrity and appearance of the vehicle. A thorough assessment is necessary to determine the extent of the damage and the appropriate repair techniques.
Start by examining the most common problem areas. The fenders often accumulate moisture and debris, making them susceptible to rust. Check around the edges and on the inner surfaces for bubbling paint or flaking metal. Similarly, the rocker panels are frequently affected because they are close to the ground and exposed to road salt and other contaminants. Look for signs of corrosion or soft spots that indicate deeper damage.
Next, inspect the floor pans and trunk area, as these sections often trap water. Remove any carpeting or sound deadening materials to reveal hidden rust. Use a flashlight to look for penetrating holes or areas that feel weak when pressed. Pay special attention to the seams and welds, where moisture tends to collect.
Don’t overlook wheel wells and corners of the bodywork. These areas are prone to rust due to their positioning and exposure. Look for signs of oxidation and consider the overall condition of the paint in these sections. Additionally, inspect the hood and trunk lids for rust near the edges, where seals may fail over time.
Finally, evaluate the underbody of the Datsun, as this area is crucial for overall structural integrity. Use a pry bar to check for soft spots or excessive flaking. If the under coating is damaged, it may allow rust to develop, so consider reapplying protective coatings after repairs.
In conclusion, a systematic approach to assessing rust damage in Datsun bodywork involves thorough examination of key areas. Early identification of rust can prevent more extensive repairs and preserve the classic nature of the vehicle.
Step-by-Step Guide to Cutting Out Rusted Sections and Welding in New Metal
Repairing rust on classic Datsun vehicles is essential to maintain their structural integrity and appearance. This guide outlines the necessary steps to effectively cut out rusted sections and weld in new metal, ensuring quality bodywork.
Step 1: Assess the Damage
Begin by thoroughly inspecting the affected area. Identify all rusted sections and determine the extent of the damage. Use a screwdriver or chisel to probe the area; if it crumbles or feels soft, it’s likely compromised. Mark the boundaries of the rusted section that needs removal.
Step 2: Gather Tools and Materials
Collect the necessary tools: an angle grinder with a metal cutting disc, a welding machine, clamps, a metal file, and safety gear such as gloves, goggles, and a mask. Acquire new metal sheets that match the gauge of the existing material for a seamless repair.
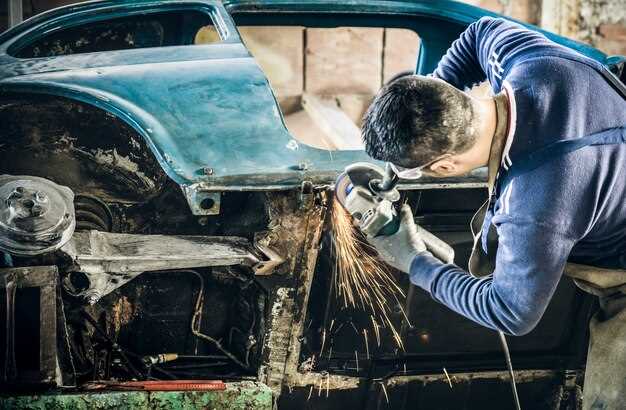
Step 3: Cut Out the Rusted Metal
Using the angle grinder, carefully cut along the marked lines to remove the rusted sections. Ensure to cut back to clean, solid metal. Depending on the size of the area, take your time to achieve a precise cut, as this will affect the fit of the new metal.
Step 4: Prepare the Edges
Once the rusted metal is removed, use a metal file to smooth the edges of the remaining metal. This will help ensure a good fit for the new piece and improve the welding process. Remove any paint or debris around the area for optimal adhesion.
Step 5: Cut the Replacement Metal
Measure the cut-out section and transfer these dimensions to the new metal sheet. Cut the replacement metal carefully, making sure it fits the gap left by the removed rusted section. Test the fit before moving on to the welding process.
Step 6: Clamp the New Metal in Place
Align the new metal piece with the edges of the existing bodywork. Use clamps to secure it firmly in position. This will prevent movement during welding, ensuring a strong bond and a clean weld line.
Step 7: Weld the New Metal
Set up your welding machine according to the manufacturer’s instructions. Start by tacking the replacement metal in several spots to hold it in place. Once secured, proceed with welding along the seams. Maintain a consistent speed and technique to avoid overheating the metal. Allow the welds to cool before proceeding.
Step 8: Finish the Bodywork
After welding, grind down any excess weld material to create a smooth finish. Apply a rust-inhibiting primer to prevent future corrosion. Once the primer is dry, you can apply paint that matches the rest of the vehicle.
Step 9: Inspect and Clean Up
Review the completed repair to ensure durability and aesthetics. Clean your workspace, disposing of any metal shavings and debris appropriately. Regular inspection of your repairs will help maintain the vehicle’s bodywork over time.
Finishing Touches: Painting and Protecting Repaired Areas on Classic Datsun

After completing the necessary repair and bodywork on your classic Datsun, the final step is to ensure that the repaired areas are not only visually appealing but also adequately protected from environmental factors. The right painting technique and protective measures can enhance the longevity of the repairs and maintain the vehicle’s classic charm.
Before applying paint, it’s essential to prepare the repaired surfaces thoroughly. Start by sanding the area lightly to ensure proper adhesion of the paint. Use a fine-grit sandpaper to create a smooth surface, and clean the area to remove dust and debris. This step is crucial for a seamless finish that blends well with the original paint.
Select high-quality automotive paint that matches the original color of your Datsun. Generally, single-stage paints are easier to work with for DIY enthusiasts, while two-stage paints (base coat and clear coat) provide a more durable finish. Apply the paint in thin, even layers, allowing adequate drying time between coats to avoid runs and drips. Aim for at least two to three coats to achieve the desired depth of color and finish.
Once the paint has dried, it’s important to apply a clear coat. The clear coat serves as a protective layer against UV rays, moisture, and contaminants that can compromise the integrity of the repair. Choose a clear coat with UV protection to prevent fading and ensure your finish looks fresh for years to come. Follow the manufacturer’s instructions for application and curing times.
Finally, to maintain the repaired sections, consider applying a wax or sealant. This will not only enhance the shine but will also provide an additional barrier against environmental damage. Regular washing and waxing will keep your classic Datsun looking pristine while preserving the quality of your repair work.


